
Sharing is caring!
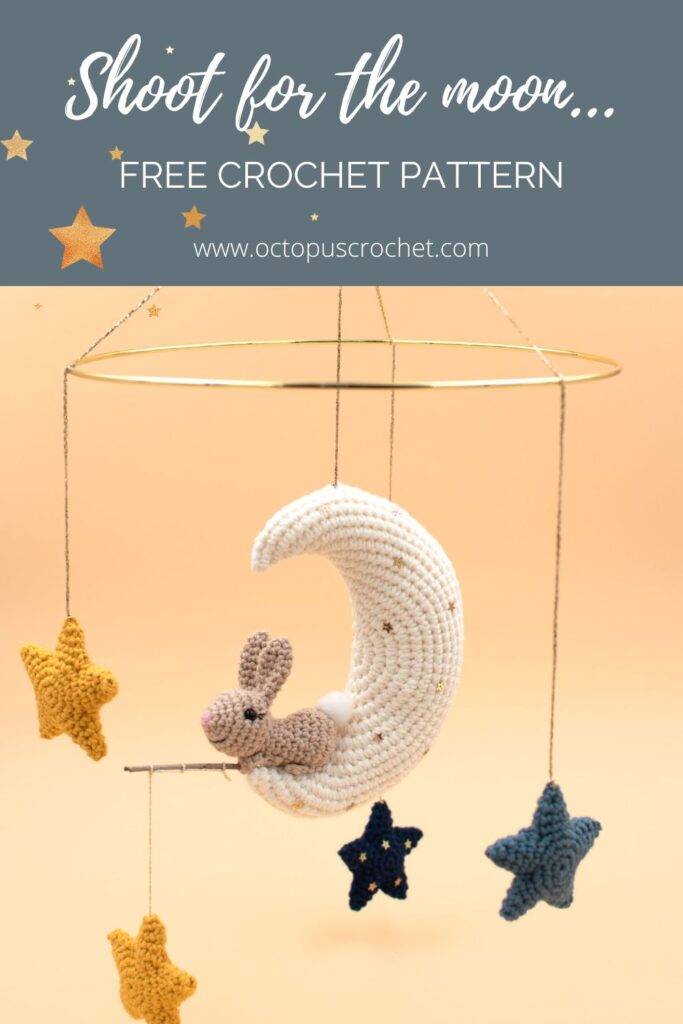
Aaaaand we got a new baby in the family! Literally! So of course I had to make a new baby mobile. Not that my 3 years old still needs the other ones, but I felt like the second baby will always get all the old stuff from the first one, clothes, toys, which is great in a way, for the parents and the planet. But I thought I would at least make him something new for his birth. That’s how I came up with this moon bunny and stars crochet mobile pattern.
Read about my inspiration and the mobile construction below, then you can purchase the pdf to get all the step-by-step pictures or scroll down for the free version.
No time right now? Pin this crochet pattern for later.
*This blog contains affiliate links for products I use, believe in or recommend. This means I will earn a small commission if you make a purchase from one of these links, and of course it is at no extra cost for you. It helps me to keep Octopus Crochet going and to keep publishing new free patterns and tutorials for you to enjoy, so thank you! You can check my full disclosure here.
If you prefer to purchase an inexpensive add-free pdf version of this pattern I’ve got you covered. The premium pdf version has all the instructions, more step by step pictures, no ad, and it’s ready-to-print for you to carry around everywhere you can crochet and are not in front of a laptop. The elephant and balloons baby mobile pattern is available in my shop on Etsy.
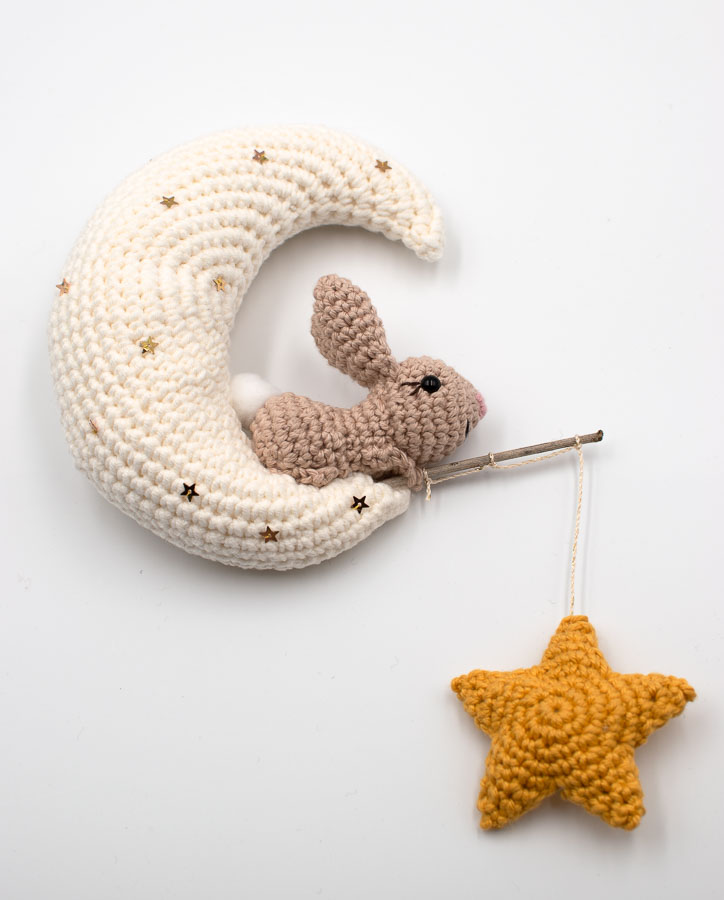
When looking for new ideas for decoration I like to lose myself on Pinterest. I came across a cute poster with a bunny fishing stars from the moon, and I thought that would make a pretty baby mobile. Especially that I didn’t know the baby gender at the time, and I feel a bunny can work both for a baby boy or a baby girl. Plus the daddy is a fisherman, but I already told you this story when I made Bruno the Polar bear…
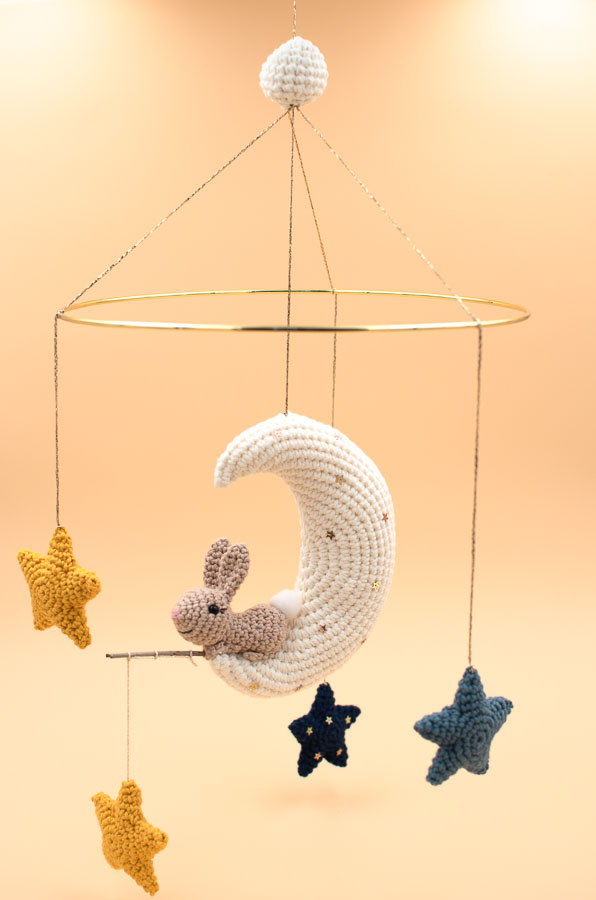
For the yarn I used two different sizes, a thick one for the moon, and a thinner one for the bunny and stars. I needed the moon to be big, and my lazyness or impatience got the better of me. When I have an idea in mind I’m so excited that I want to see the result fast, and I’m not a huge fan of endless rounds with more than 70 stitches. And it does grow faster with a thicker yarn! So do read carefully the material instructions to end up with the right proportions.
Scroll down for the free patterns links below or you can also directly purchase a nice add-free pdf version of this project in my shop on Etsy for a small fee. The pdf version has all the pictures, instructions, and it’s ready-to-print to carry along with you wherever you want to sit and crochet!
Crochet hooks: 3.5mm / US E-4 hook, and 2.5mm hook (or 2.75mm / US C2)
Yarn:
o #4 / aran / worsted yarn, 80% cotton 20% Milk Fiber, color off-white (I use a local shop yarn, an equivalent would be Paintbox Cotton Aran, but keep the 3.5mm hook to obtain tight stitches and avoid the fiberfill to show)
o DMC Happy cotton #794 (yellow), #758 (dark blue), #750 (grey-blue), #773 (light beige)
Tapestry needle
Fiberfill
Stitch marker or a strand of thinner yarn
A pair of 6mm safety eyes
Ball point pins for assembly
Sewing needle
Yellow sewing thread (or any other color similar to your sequins color)
Star shaped sequins with a hole to embroider
25 cm (9.8″) metal ring in gold color (it could also be a wooden/bamboo ring)
Golden decorative string to attach the elements to the mobile (or yarn)
Glue and a white pompom for the bunny tail (1.5cm / 0.6″ large).
Intermediate. The moon is beginner level, the stars and bunny intermediate.
Gauge for the moon with the above material: 5-round circle = 5cm (2″).
Gauge for the stars and bunny with the above material: 5-round circle = 4cm (1.6″). Find out how to measure gauge for amigurumis in my tutorial here.
With the material mentioned above and when gauge is achieved:
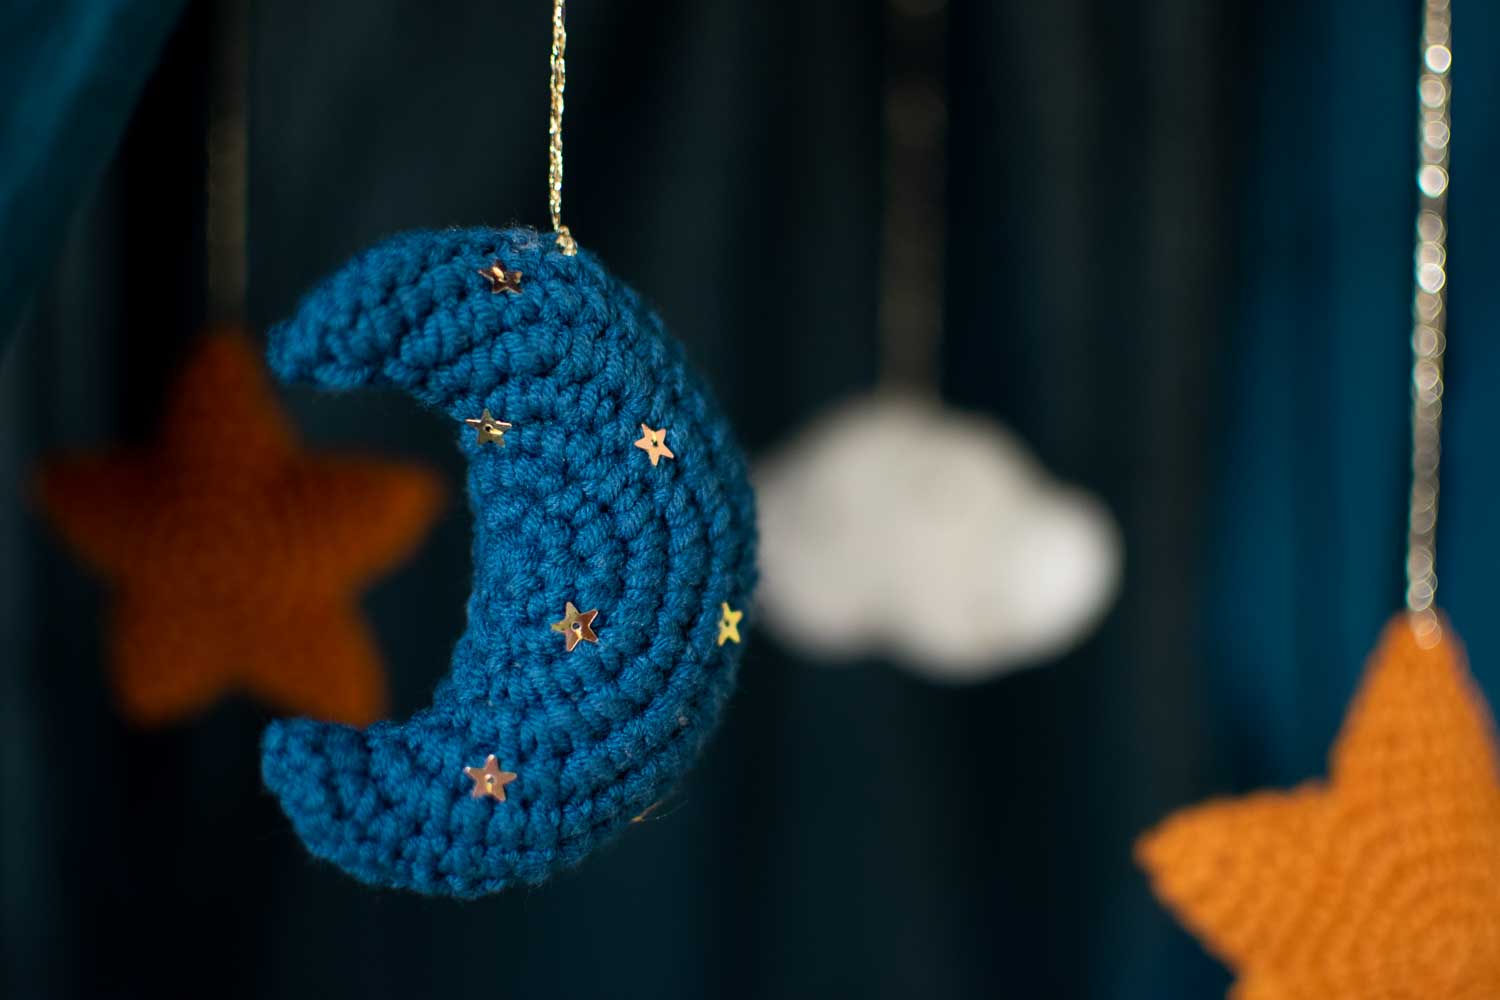
The moon is 15.5cm tall (5.9″)
The bunny is 7cm long (2.7″) and 6cm tall (2.4″) (to the top of the ears).
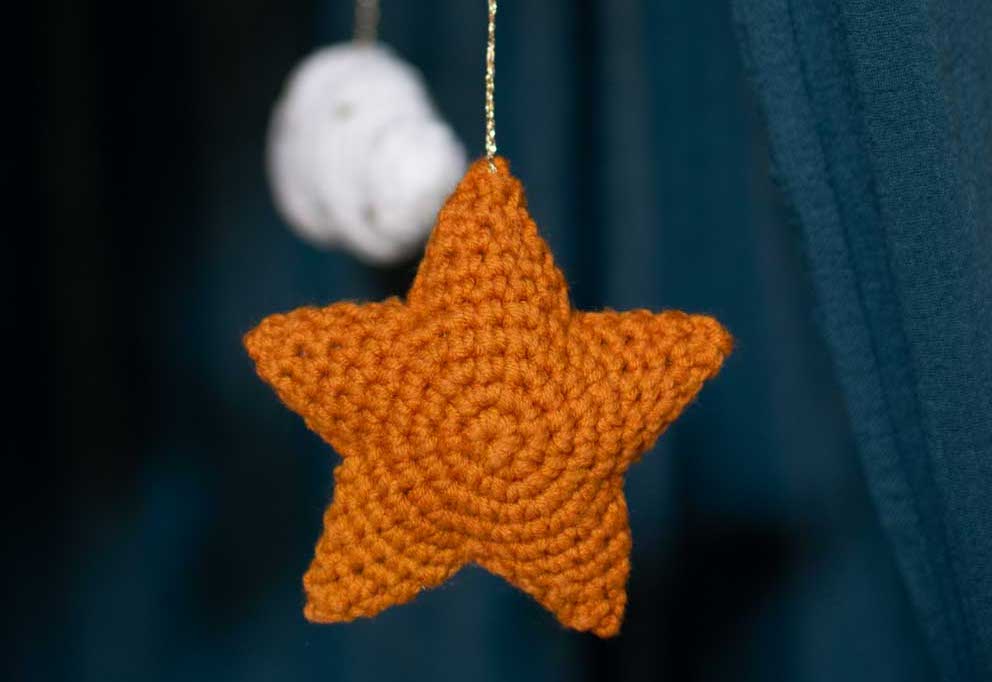
The stars are 6.5 cm large (from tip to tip) (2.5″)
The ball diameter is 4cm (1.6″)
st: stitch/es
sc: single crochet
sl st: slip stitch
inc: single crochet increase (work 2 sc into the same st)
dec: single crochet decrease (single crochet two stitches together).
[number]: total number of stitches of the round (or row)
Rnd: round
(…) x 2: repeat whatever is in between the parenthesis the number of times indicated
With off-white yarn and 3.5mm hook.
Rnd 1: work 5sc into a magic ring. [5]
Rnd 2: 5inc. [10]
Rnd 3: (sc, inc) x 5. [15]
Rnd 4: (3sc, inc, sc) x 3. [18]
Rnd 5: sc, inc, 4sc, inc, 5sc, inc, 5sc. [21]
Rnd 6: sc in each st around. [21]
Rnd 7: (5sc, dec) x 3. [18]
Rnd 8: 2sc, dec, 3sc, dec, 4sc, dec, 3sc. [15]
Rnd 9: (sc, dec) x 5. [10]
Rnd 10: 4dec, fasten off, finish stuffing and sew closed.
With DMC Happy Cotton yarn and a 2.5mm hook.
Rnd 1: work 6sc into a magic ring. [6]
Rnd 2: 6inc. [12]
Rnd 3: (inc, sc) x 6. [18]
Rnd 4: (inc, 2sc) x5, inc, sc, inc. [25]
Fasten off, weave in end on the wrong side.
Make a second one, and don’t fasten off.
First point: each point is worked in spiral, like a reverse cone. Check the tutorial video here (larger star size but you can get the idea).
Rnd 1: Put the two circles together (wrong sides together) and work 1 sc across both sides to join them. Mark that stitch with a stitch marker. Now count 4 stitches on both circles, and mark the 5th stitch with a stitch marker across both circles.
Rnd 2: (turn again and start in the first stitch from Rnd 1, the one with the stitch marker)
dec, 3sc, dec, 3sc. [8]
Keep going in continuous rounds.
Rnd 3: dec, 2sc, dec, 2sc. [6]
Rnd 4: dec, slst, FO and sew closed.
Weave in ends.
Other three points: with a new strand of yarn, make a slip knot on your hook, and repeat rounds 1 to 4, starting your first sc into the last stitch of the previous point basis (instead of starting in the next free stitch). This first sc is worked across both circles.
Fifth point: Stuff the star (lightly) before starting the fifth point, and don’t forget to fill the last point just before closing it. Repeat rnds 1-4.
Make 3 more.
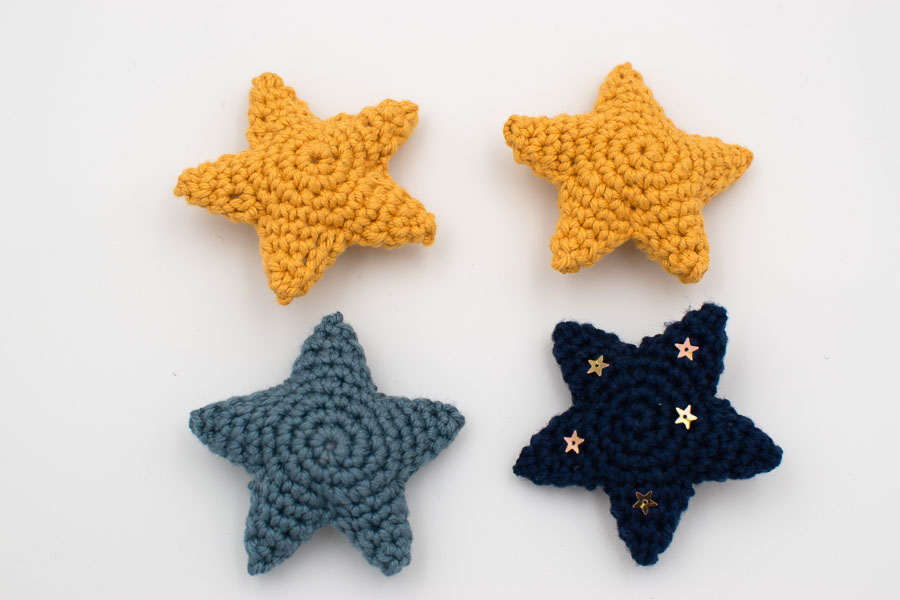
You can now embroider some star sequins.
With off-white yarn. The moon is worked with a thicker yarn and bigger hook, you can refer to the list of material at the begining of this pattern to ensure you get the same proportions.
Rnd 1: Work 8sc into a magic ring. [8]
Rnd 2: inc in each st around. [16]
Rnd 3: (inc, sc) x 8. [24]
Rnd 4: (inc, sc) x 12. [36]
Rnd 5: (2inc, 4sc, inc, 4sc, inc, 4sc, 2inc) x 2. [48]
Rnd 6: (2inc, 20sc, 2inc) x 2. [56]
Rnd 7: (2inc, 24sc, 2inc) x 2. [64]
It’s totally normal that the shape gets a bit wavy on the way, as we will fold it in two later.
Rnd 8: (2inc, 9sc, inc, 8sc, inc, 9sc, 2inc) x 2. [76]
Rnd 9: (2inc, 34sc, 2inc) x 2. [84]
Rnd 10: (3inc, 8sc, inc, 8sc, inc, 9sc, inc, 8sc, 3inc) x 2. [102]
Rnd 11: (2inc, 47sc, 2inc) x 2. [110]
Rnd 12: (2inc, 17sc, inc, 16sc, inc, 16sc, 2inc) x 2. [122]
Rnd 13: (inc, 59sc, inc) x 2. [126]
Rnd 14: (2inc, 19sc, inc, 19sc, inc, 19sc, 2inc) x 2. [138]
Fasten off and leave a tail of at least 150cm to sew closed.
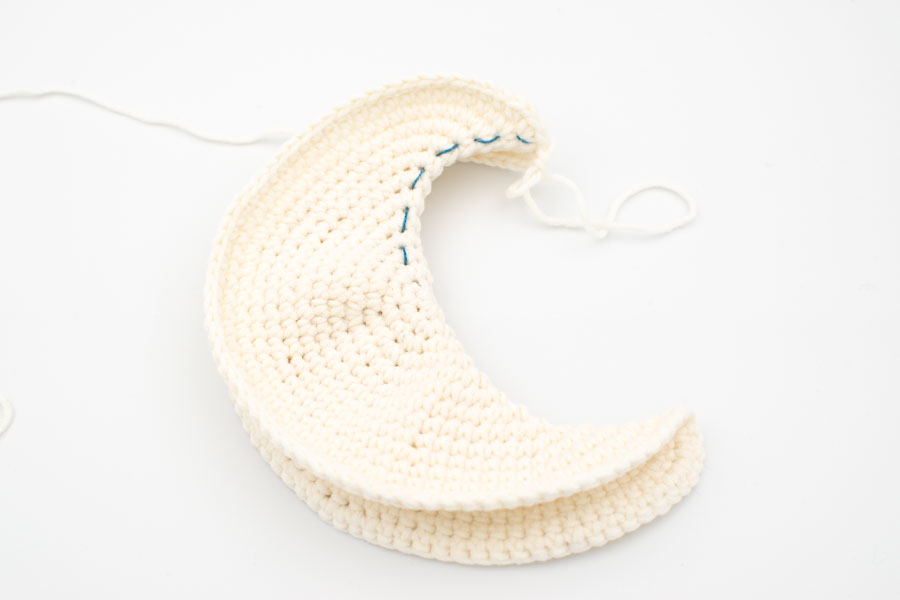
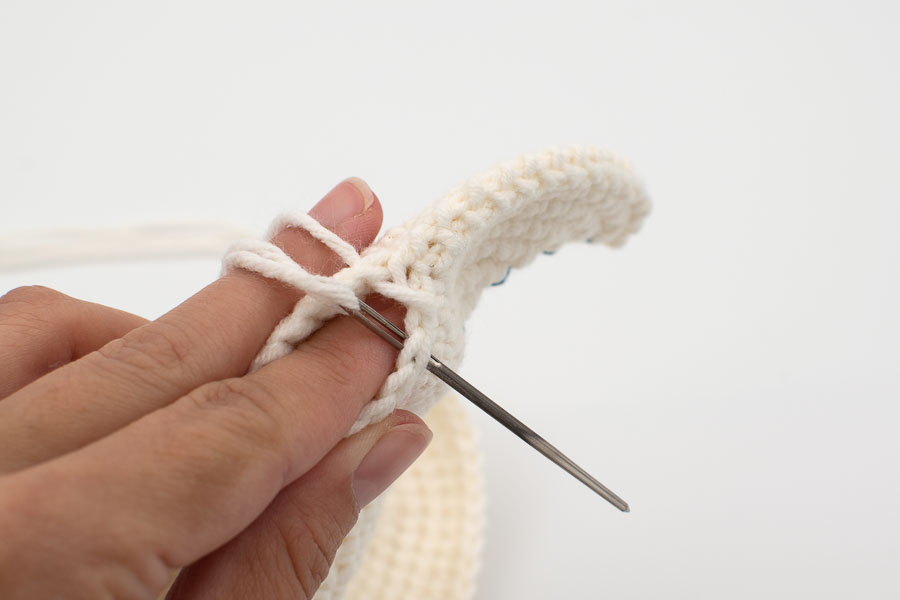
Fold in two at the level of the first stitch of the round (so that both sides are identical), with the wrong side inside.
Start sewing both edges together : insert your tapestry needle from inside to outside, under both loops of the opposite stitch.
Stuff with fiberfill along the way and before closing. Stuff evenly to shape the moon easily and nicely.
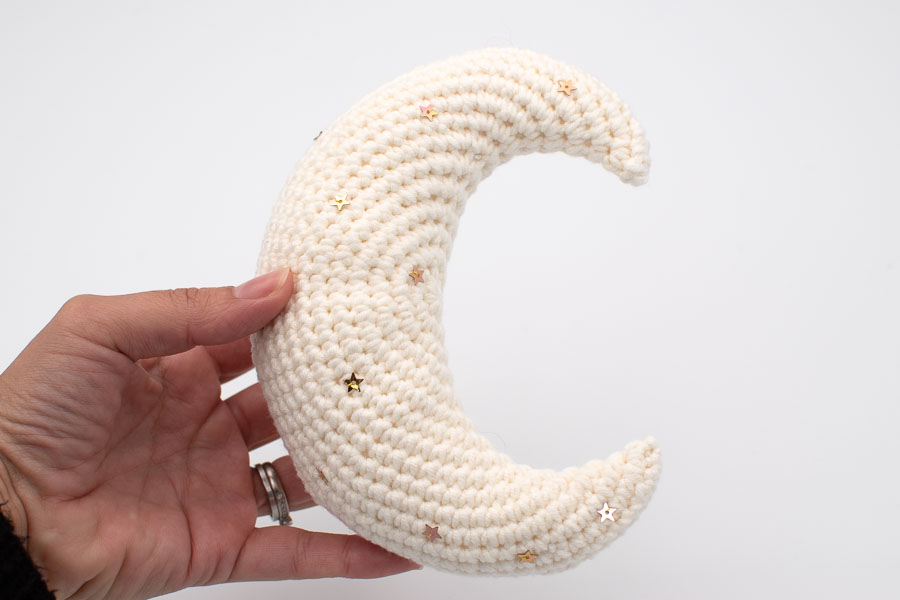
Finally, embroider star sequins (or beads, up to you!).
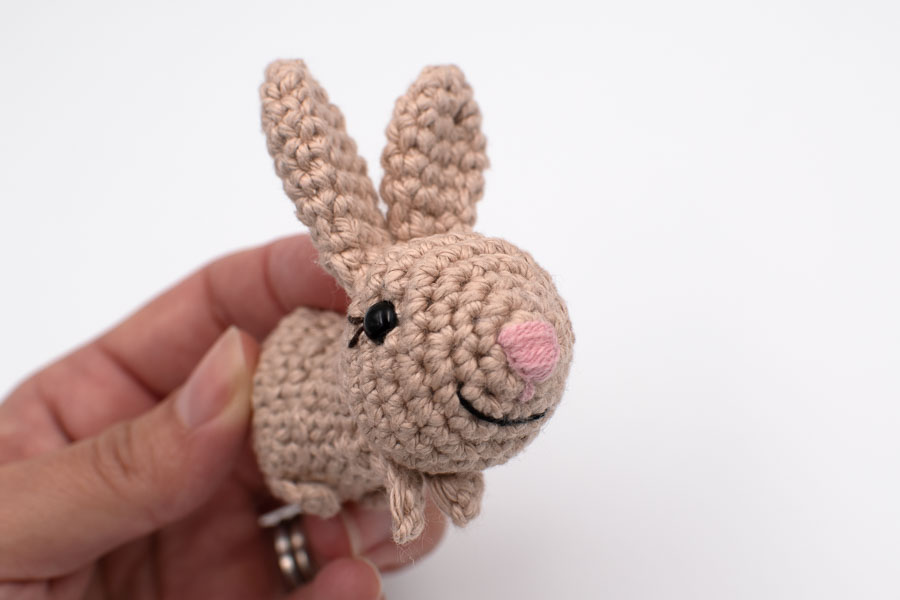
With DMC Happy Cotton light beige yarn and a 2.5mm hook.
Rnd 1: Work 6sc into a magic ring. [6]
Rnd 2: (sc, inc) x 3. [9]
Rnd 3: (2sc, inc) x 3. [12]
Rnd 4: (sc, inc) x 6. [18]
Rnd 5: (2sc, inc) x 6. [24]
Rnd 6 – 8 : sc around. [24]
Rnd 9: (2sc, dec) x 6. [18]
Rnd 10: (sc, dec) x 6. [12]
Insert safety eyes between row 6 and 7, 9 stitches between the eyes.
Fill with fiberfill.
Rnd 11: 6dec. [6]
Fasten off leaving a long tail to sew to the body, finish stuffing with fiberfill and sew closed. Embroider the nose, the lashes, and the smile.
Rnd 1: work 6sc into a magic ring. [6]
Rnd 2: inc in each st around. [12]
Rnd 3: (sc, inc) x 6. [18]
Rnd 4: (2sc, inc) x 6. [24]
Rnd 5: sc around. [24]
Rnd 6: (2sc, dec) x 6. [18]
Rnd 7: (dec, 14sc, dec). [16]
Rnd 8: (dec, 12sc, dec). [14]
Rnd 9: dec, 12sc. [13]
Rnd 10: sc around. [13]
Rnd 11: sc around. [13]
Chain 6.
Row 1: starting in the second chain from the hook, sc in each st. [5]
Fasten off, leave a tail for sewing.
Make 3 more.
Rnd 1: work 4sc into a magic ring. [4]
Rnd 2: (sc, inc) x 2. [6]
Rnd 3: (sc, inc) x 3. [9]
Rnd 4 – 6 : sc around. [9]
Rnd 7: (sc, dec) x 3. [6]
Rnd 8: sc around. [6]
Flatten the ear, and single crochet both sides together. Leave a tail to sew to the head. Make one more.
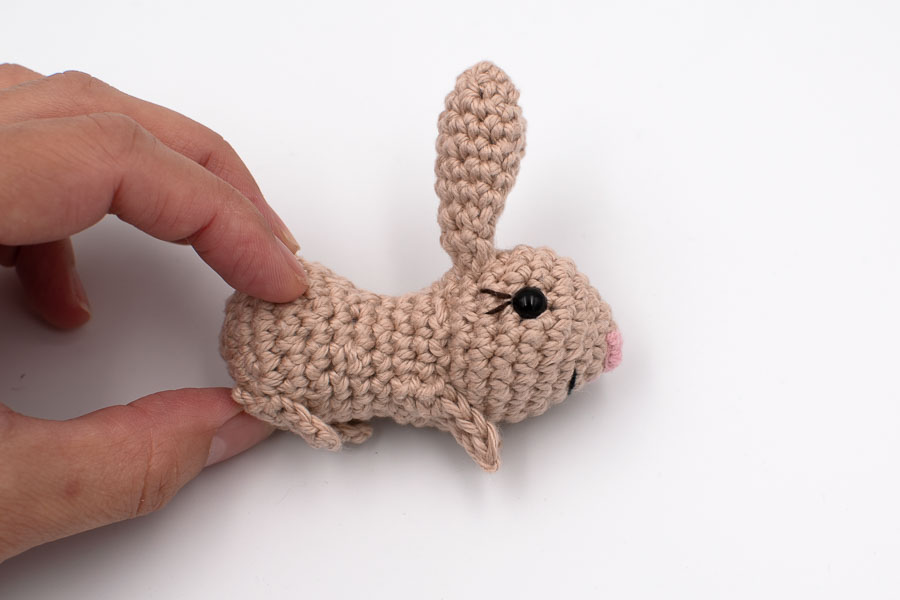
Sew the ears to the head two rows behind the eyes.
Fill the body with fiberfill, and sew the head to the body, so that the bunny butt points upwards.
Sew the legs. Attach the upper legs with only one or two stitches at the base of the leg, so that the bunny can “hold” the fishing rod.
Glue the tail.
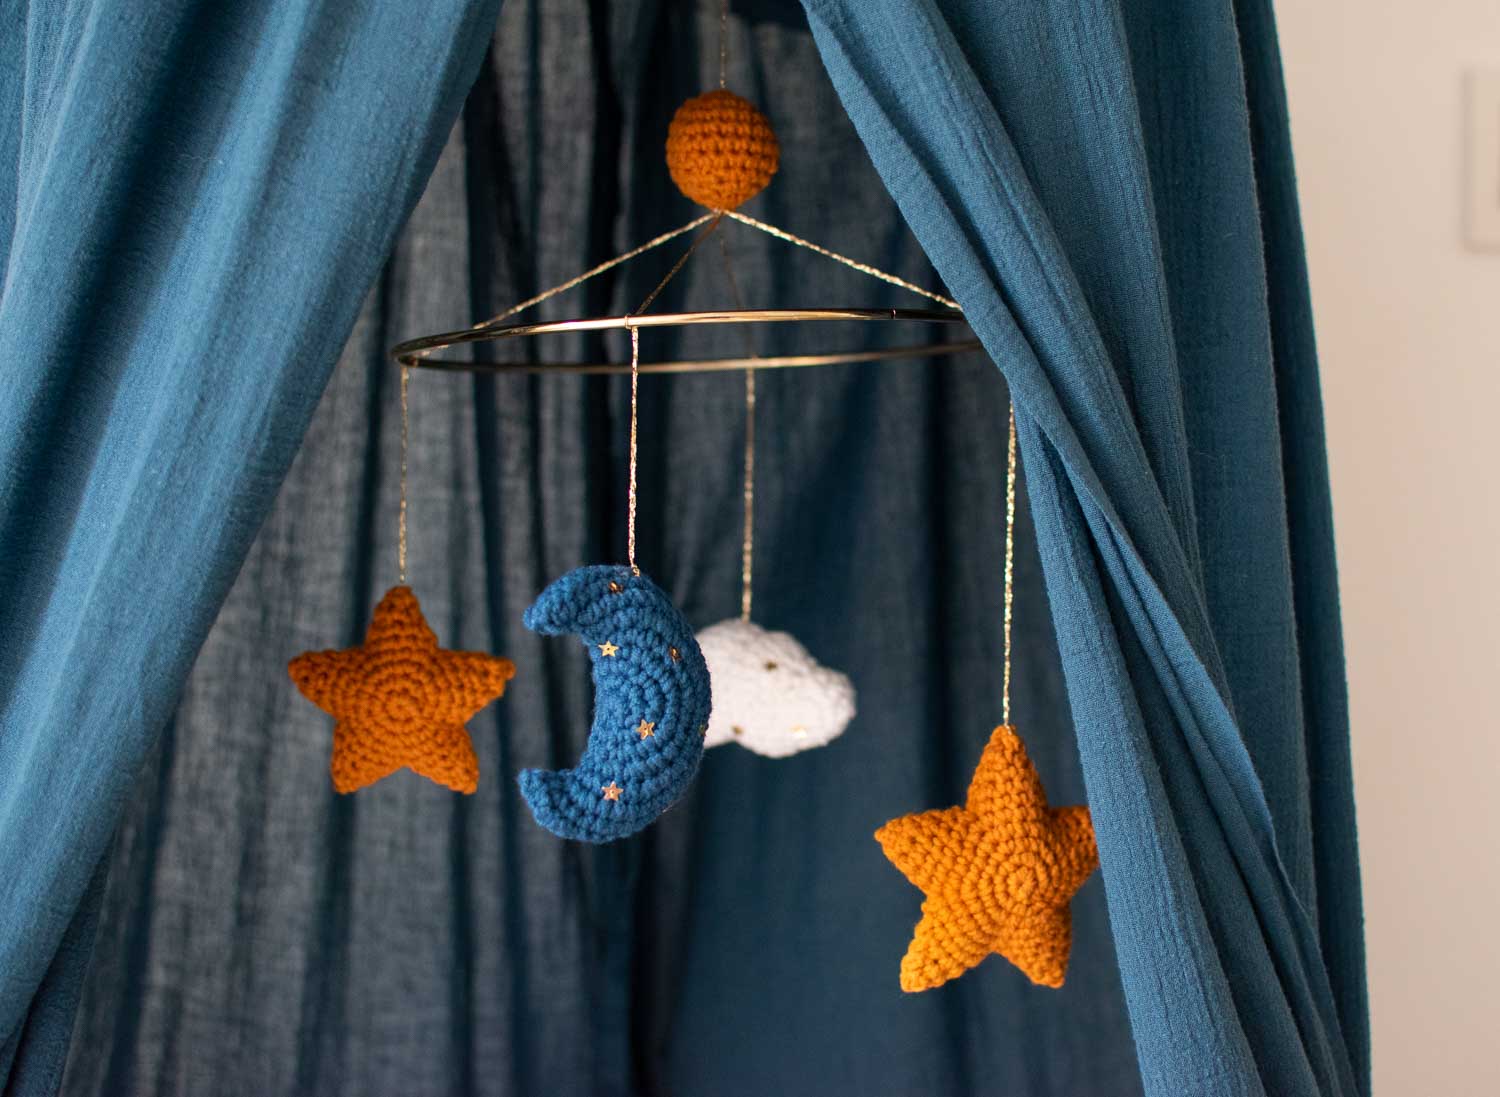
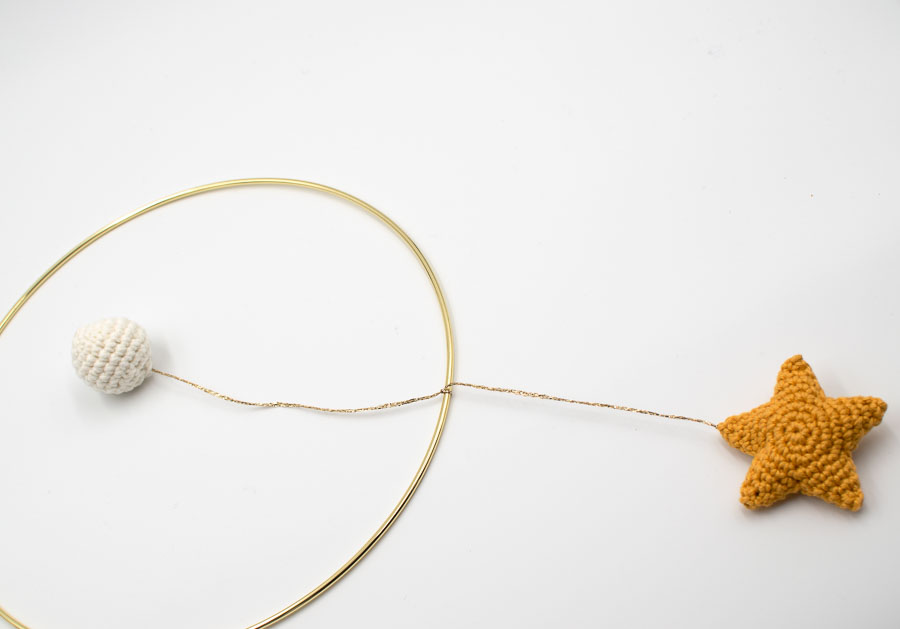
To assemble the mobile, start with the stars and the ball first, and then the moon with the bunny to be able to adjust the height of the moon exactly where you like it. Important: Make sure you double or tripple secure all the knots, to avoid any element to fall in a baby crib, since it is likely to be hanged above a crib.
Now sew the strings to the bottom of the ball. This is the tricky and important part: to have a balanced mobile, the length of each string between the ring and the ball should be exactly the same. On my mobile, it is 16cm / 6.3″, because I wanted the ball to be a bit higher to hang the moon. Hide the tails inside the ball.
Here you go! Congratulations on finishing this cute moon bunny and stars crochet mobile for a very lucky baby!
I’d be really happy to see your finished mobile ! Tag me on Instagram, you can find me as @octopuscrochetdesign and use the hashtag #octopuscrochet
I look forward to seeing it!
Crochet Designer
Hi friend, I learned crochet online, so you can do it too! I created this blog to share my tips and tricks for beginners and detailed patterns of amigurumis, crochet toys and home decor items. Jump in and beware of the crochet addiction: it’s real!!!