Sharing is caring!
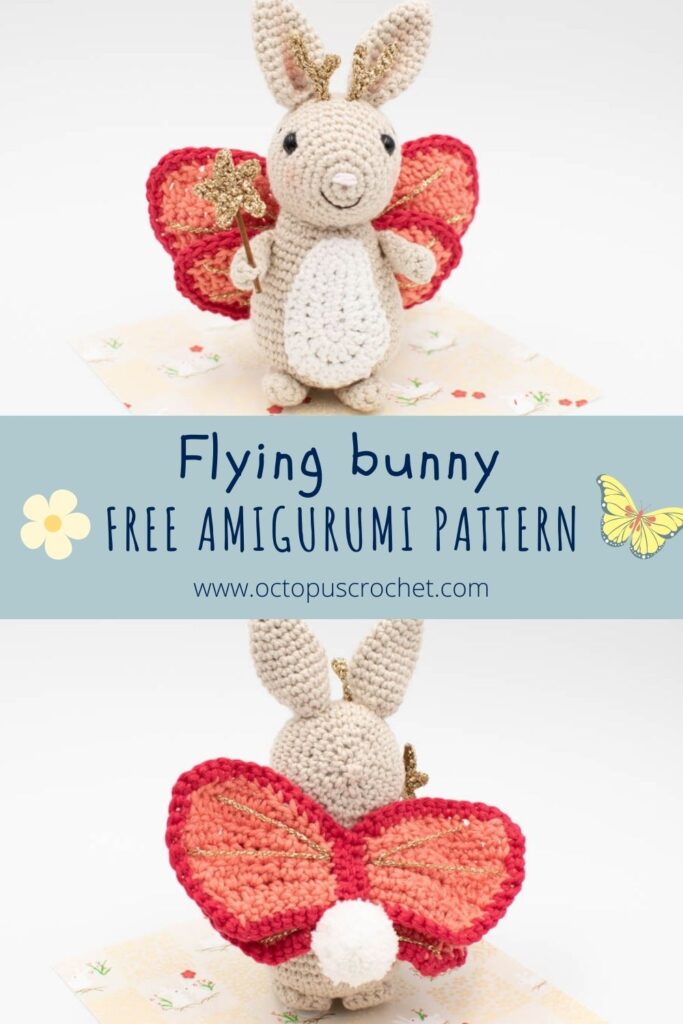
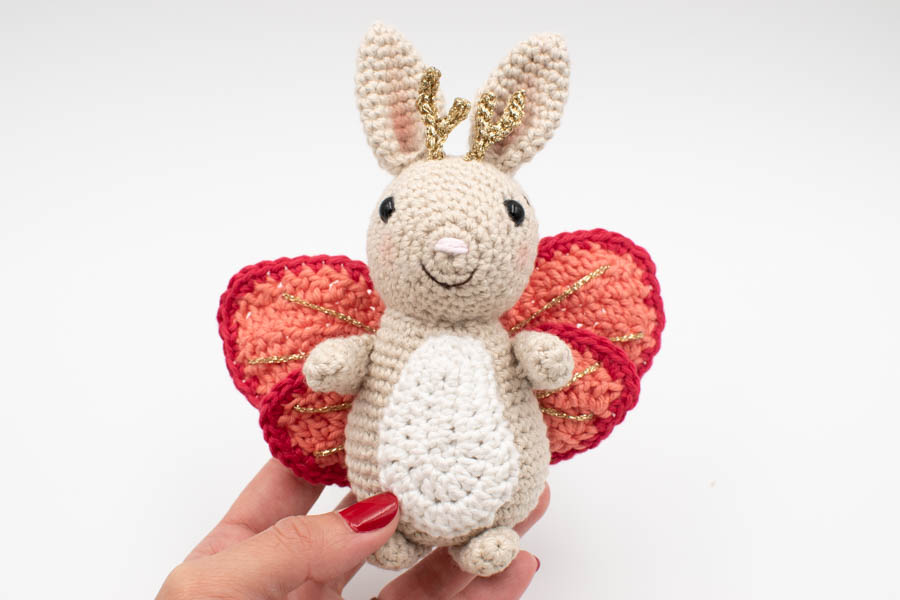
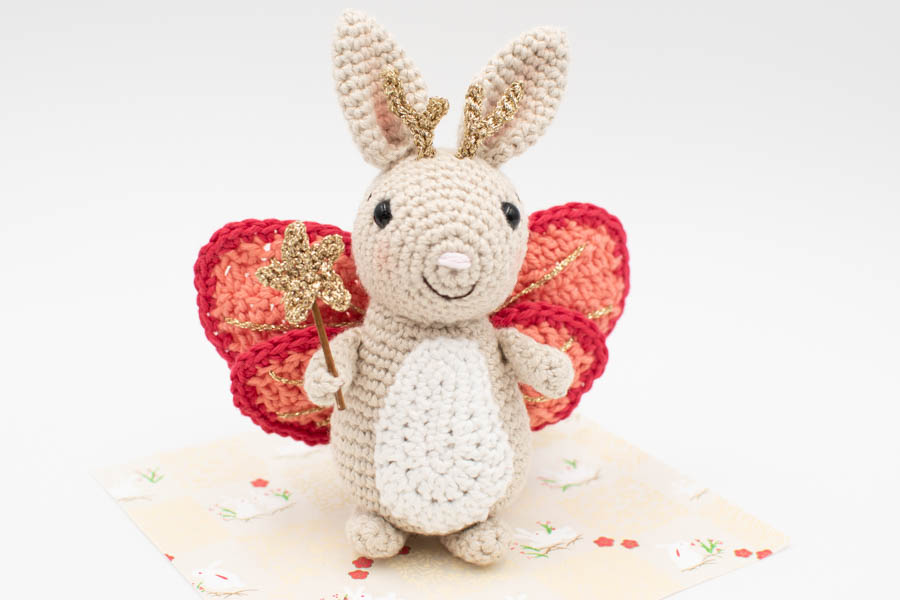
This flying bunny amigurumi pattern was my entry to the famous Fantasy Creatures contest organized by Amigurumi.com in 2022! I’m so grateful for all the votes I got from my subscribers but also unknown crocheters around the world, so it’s a great pleasure to finally publish this pattern on my blog to thank you all for your continuous support.
Read about my inspiration and the pattern below, then you can purchase the pdf to get all the step-by-step pictures or scroll down for the free version.
No time right now? Pin this crochet pattern for later.
*This blog contains affiliate links for products I use, believe in or recommend. This means I will earn a small commission if you make a purchase from one of these links, and of course it is at no extra cost for you. It helps me to keep Octopus Crochet going and to keep publishing new free patterns and tutorials for you to enjoy, so thank you! You can check my full disclosure here.
If you prefer to purchase an inexpensive add-free pdf version of this pattern I’ve got you covered. The premium pdf version has all the instructions, more step by step pictures, no ad, and it’s ready-to-print for you to carry around everywhere you can crochet and are not in front of a laptop. The flying bunny amigurumi pattern is available in my shop on Etsy.
When doing some research for the Fantasy Creatures contest, I was intrigued by this Wolpertinger bunny, close to the Jackalope legend. But these guys are scary!! And the rules were “cute fantasy animals”. Cute. Not Scary. So that’s where I changed things a little and it turned out to be this cute flying bunny with butterfly wings, golden antlers and a magic wand to spread good vibes in the forest. In my wildest dreams, it’s hoping around, turning stunning flowers into delicious carrots…
For the yarn I used two of my favorites yarns for amigurumis (I know I have many, but what can I do?!!): Paintbox Cotton DK and DMC Happy Cotton, with a 2.5mm (US C2) crochet hook. For the golden yarn I was running out of stock and that unfortunate situation led me to discover (oh JOY!!!) the Rico Design Lamé Gold that is absolutely gorgeous.
Scroll down for the free patterns links below or you can also directly purchase a nice add-free pdf version of this project in my shop on Etsy for a small fee. The pdf version has all the pictures, instructions, and it’s ready-to-print to carry along with you wherever you want to sit and crochet!
Intermediate.
This pattern is written with US crochet term abbreviations.
Gauge for the bunny with the above material (2.5mm hook): 5-round circle = 4cm (2″). Find out how to measure gauge for amigurumis in my tutorial here.
With the material mentioned above and when gauge is achieved:
st: stitch/es
sc: single crochet
hdc: half double crochet
dc: double crochet
hdc-inc: half double crochet increase (work 2 hdc into the same st).
dc-inc: double crochet increase (work 2 dc into the same st).
sl st: slip stitch
inc: single crochet increase (work 2 sc into the same st)
dec: single crochet decrease (single crochet two stitches together).
[number]: total number of stitches of the round
Rnd: round
(…) x 2: repeat whatever is in between the parenthesis the number of times indicated
in BLO: in the back loop only
in FLO: in the front loop only
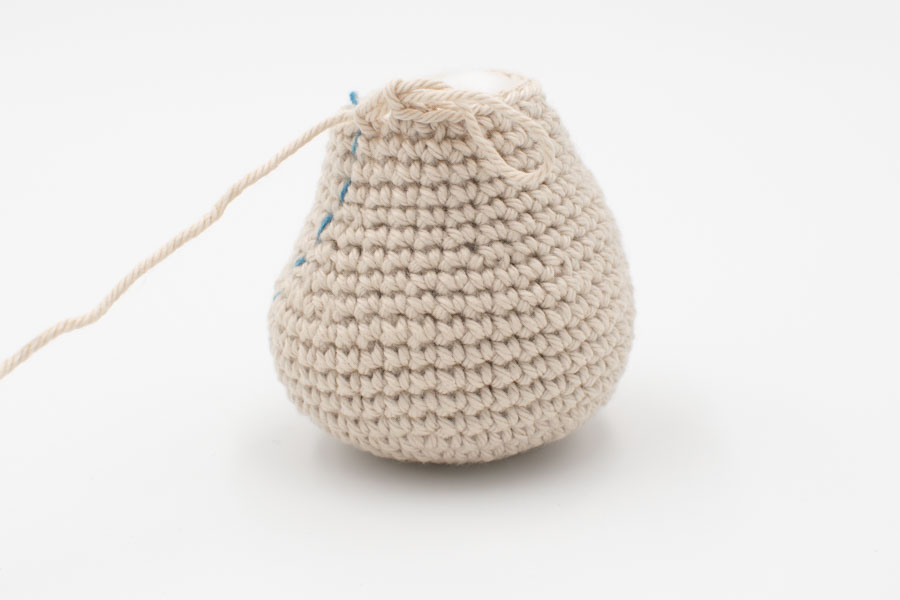
Rnd 1: work 6sc into a magic ring. [6]
Rnd 2: inc in each st around. [12]
Rnd 3: (sc, inc) x 6. [18]
Rnd 4: sc in each st around. [18]
Rnd 5: (inc, 2sc) x 6. [24]
Rnd 6: sc in each st around. [24]
Rnd 7: (3sc, inc) x 6. [30]
Rnd 8: sc around. [30]
Rnd 9: (inc, 4sc) x 6. [36]
Rnd 10 – 14: sc around. [36]
Rnd 15: (dec, 4sc) x 6. [30]
Insert 8mm safety eyes between rounds 7 and 8, 9 stitches apart when counting stitches on round 7.
Start stuffing with fiberfill.
Rnd 16: (3sc, dec) x 6. [24]
Rnd 17: (2sc, dec) x 6. [18]
Rnd 18: (sc, dec) x 6. [12]
Rnd 19: 6dec. [6]
Finish stuffing, fasten off, and sew closed.
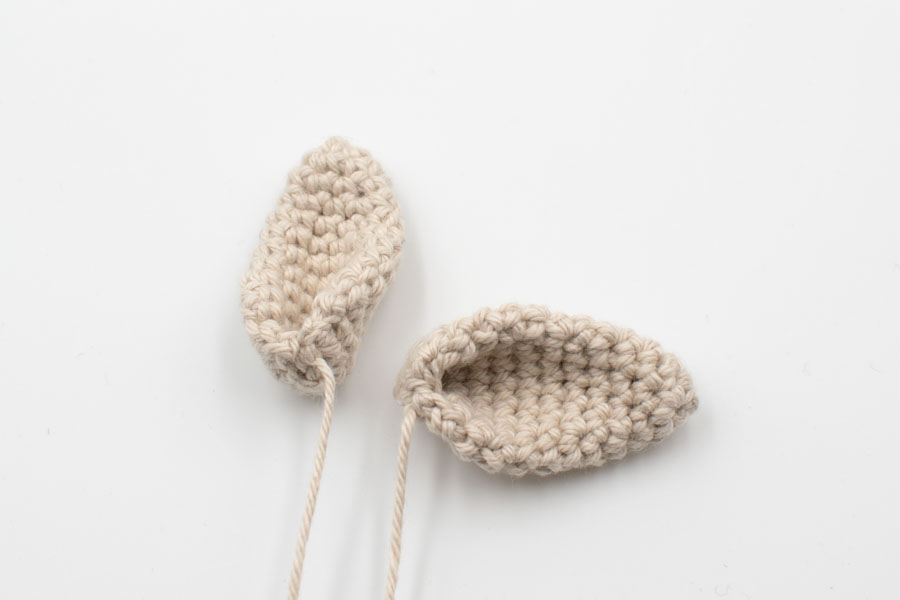
Rnd 1: work 4 sc into a magic ring. [4]
Rnd 2: (inc, sc) x 2. [6]
Rnd 3: (inc, sc) x 3. [9]
Rnd 4: sc around. [9]
Rnd 5: (2sc, inc) x 3. [12]
Rnd 6: sc around. [12]
Rnd 7: (3sc, inc) x 3. [15]
Rnd 8: sc around. [15]
Rnd 9: (4sc, inc) x 3. [18]
Rnd 10 – 11: sc around. [18]
Rnd 12: (4sc, dec) X 3. [15]
Flatten the ear and sc both sides together (it should make 7sc).
Fasten off, leaving a long tail for sewing. Fold the base of the ear and with your tapestry needle, sew the tail to the opposite side.
Make a second one.
Rnd 1: work 6sc into a magic ring. [6]
Rnd 2: inc in each st around. [12]
Rnd 3: (sc, inc) x 6. [18]
Rnd 4: (2sc, inc) x 6. [24]
Rnd 5: (3sc, inc) x 6. [30]
Rnd 6: (4sc, inc) x 6. [36]
Rnd 7: (5sc, inc) x 6. [42]
Rnd 8- 12: sc around. [42]
Rnd 13: 37sc, dec, sc, dec. [40]
Rnd 14: sc, dec, sc, dec, 9sc, dec, 10sc, dec, 9sc, dec. [35]
Rnd 15: (5sc, dec) x 5. [30]
Rnd 16: sc around. [30]
Rnd 17: dec, 11sc, dec, sc, dec, 10sc, dec. [26]
Rnd 18 – 20: sc around. [26]
Rnd 21: (4sc, dec) x 4, 2sc. [22]
Fasten off, leave a long tail to sew the body to the head later.
With golden yarn.
Make a slip knot, leaving a tail for sewing.
Chain 7. Starting in the second chain from the hook, 3 sl st back, chain 6, 5 sl st back, finish with 3 sl st in the last 3 chains. Fasten off and leave a tail to sew to the head.
With white. The belly is crocheted around a foundation chain.
Make a slip knot, and chain 7. I like to work in the back bump of the chains.
Rnd 1: inc in second chain from the hook, then one sc in each of the next 4 chains, 4sc into the next chain. Rotate to start crocheting on the other side of the chain. Work one sc in the starting chain of the other side, and one sc in each of the next 3 chains. Work 2sc into the last chain. [16]
Rnd 2: inc, 4sc, hdc, hdc-inc, 3dc-inc, hdc-inc, hdc, 3sc, inc. [23]
Rnd 3: inc, 6sc, hdc, dc, 6dc-inc, dc, hdc, 5sc, inc [31].
Fasten off, leaving an extra long tail of 50cm (20″) to sew to the body.
Try to loosen up your tension a bit for the wings, compared to the tight tension needed for amigurumis. The wings are crocheted in rows, and they will look nicer if they are a bit more flexible.
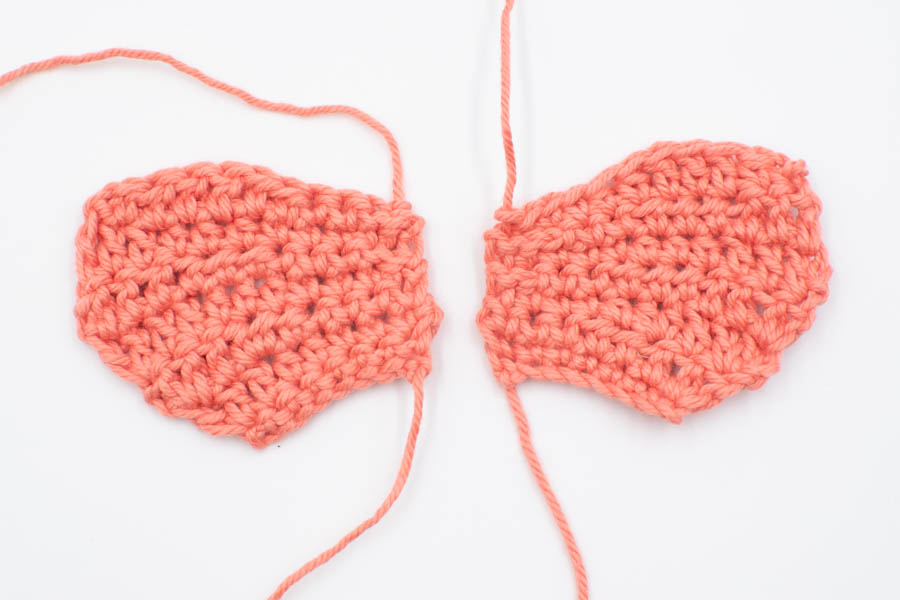
With salmon pink.
Make a slip knot. Chain 8.
Row 1: starting in second chain from the hook, sc in each st. [7]
Row 2: ch 1, turn, 3sc, 2hdc, dc, dc-inc. [8]
Row 3: ch 1, turn, dc-inc, dc, hdc-inc, hdc, 3sc, sl st. [10]
Row 4: ch 1, turn, sl st, 3sc, 3hdc, 2dc, dc-inc. [11]
Row 5: ch 1, turn, 3dc, 3hdc, 3sc, 2 sl st. [11]
Row 6: ch 1, turn, 2 sl st, 3sc, 3hdc, 3dc. [11]
Row 7: ch 1, turn, skip 1, hdc, 3dc, 2hdc, 2sc, 2 sl st. [10]
Fasten off, make a knot and weave in the yarn tails.
Make a second one.
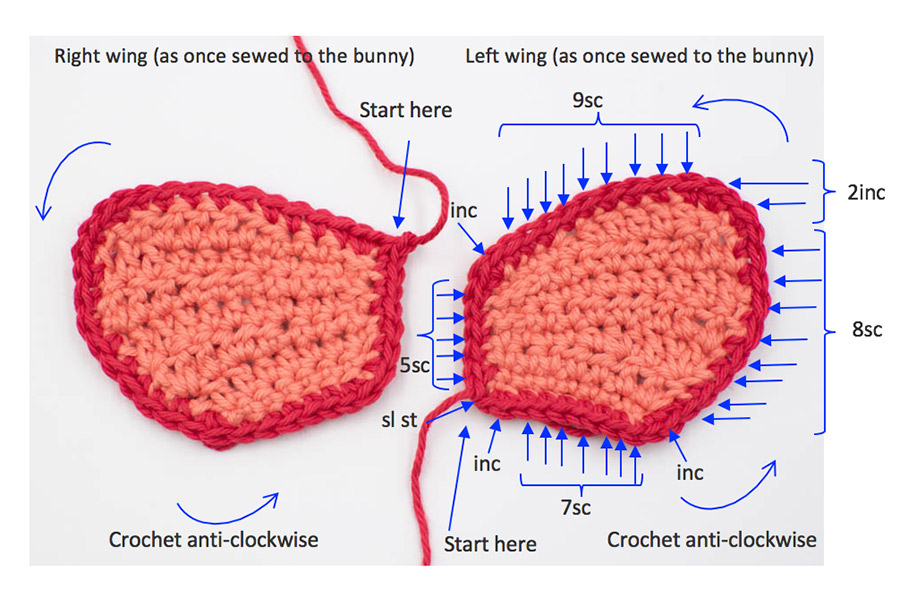
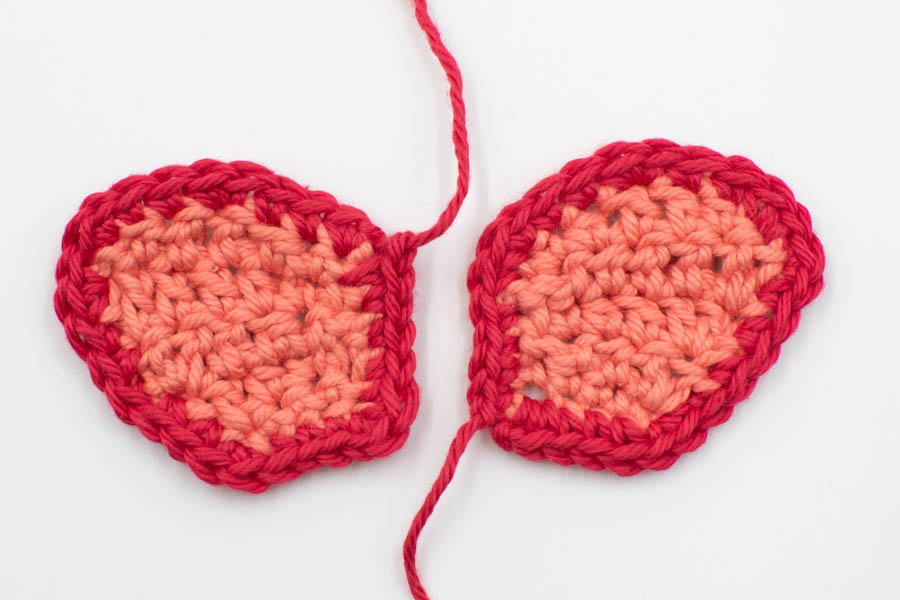
Now we are going to crochet the border of the wings with DMC Happy Cotton shade 754 (pinkish red).
Important note 1 : On the edges of the wings, it can be tough sometimes to find where to insert your hook. It doesn’t matter if you miss a stitch, the idea is to single crochet all around regularly, increasing at every corner of the wing. Try to do the same for both wings.
Important note 2 : Since the wings are mirroring each other at the end, you need to make sure you end up with the right side of your border facing you on both wings. To achieve that, put them down in their final position and crochet counterclockwise (see chart below).
Left wing: start at the bottom left corner (see image above).
Make a slip knot. Inc in first st, 7sc, inc after the bottom right corner, 8sc on the right edge, 2inc before the top right corner, 9sc along the upper edge, inc at the top left corner, 5sc on the left edge, sl st to first st of the round. This should make 40 stitches in total.
Fasten off leaving a long tail for sewing.
Do the same on the right wing: start at the top right corner.
Make a slip knot. Inc in first st, 9sc along the upper edge, 2inc, 8sc along the left edge, inc before the bottom left corner, 7sc, inc, 5sc on the right edge, sl st.
Fasten off, leaving a long tail for sewing.
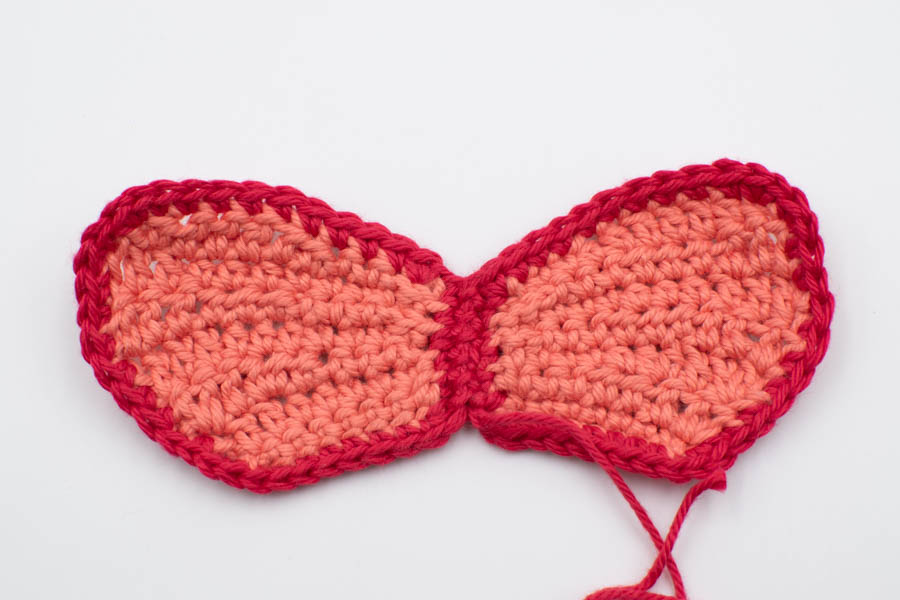
Weave in the pink tails and the red starting tails. Use one of the red tails to sew the wings together at the center. You’ll use the other tail to attach them to the bunny.
Make a slip knot. Chain 5. The turning chain doesn’t count as a stitch.
Row 1: starting in second chain from the hook, sc in each st. [4]
Row 2: ch 1, turn, sl st, sc, hdc, dc-inc. [5]
Row 3: ch 1, turn, dc-inc, dc, hdc, sc, sl st. [6]
Row 4: ch1, turn, sl st, sc, hdc, 2dc, dc-inc. [7]
Row 5: ch1, turn, skip 1, hdc, 2dc, hdc, sc, sl st. [6]
Fasten off. Weave in the pink tails.
Now let’s crochet the border with pinkish red, exactly the same way as you did previously for the upper wings.
Left wing: start at the bottom left corner.
Make a slip knot. Inc in first st, 3sc, inc just after the bottom right corner, 5sc on the right edge, 2inc before the top right corner, then on the top edge work 2sc, inc, 2sc, inc (the last increase should be in the sl st from row 5), then work 5sc on the left edge, and sl st to the first st of this border. This makes 29 stitches for the border. Fasten off leaving a long tail for sewing. Weave in the starting tail.
Right wing: start at the top right corner.
Inc in first st (the first st is the sl st from row 5. Then on the top edge work 2sc, inc, 2sc, then 2inc after the top left corner, then on the left edge, work 5sc, inc before the bottom left corner, then 3sc on the bottom edge, inc in last st, 5sc on the right edge, sl st to first st of the border. Fasten off leaving a long tail for sewing. Weave in the starting tail.
Don’t sew the lower wings together, they will be sewn directly to the bunny, separately.
Check my easy pom pom tutorial here.
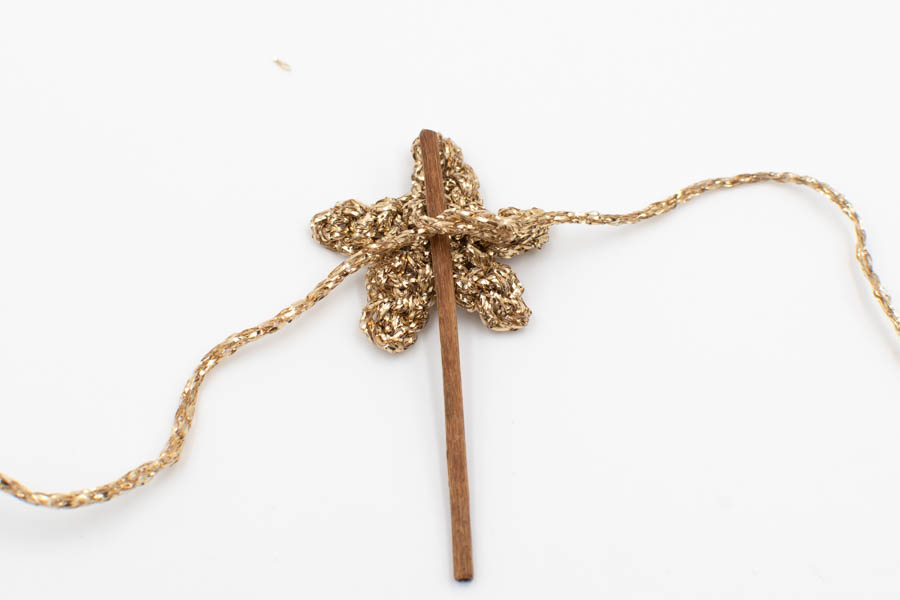
With gold.
Rnd 1: leave a 10cm (4″) starting tail and work 5 sc into a magic ring. [5]
Rnd 2: sl st in first st, (chain 3, sl st in second chain from the hook, sc in next chain, sl st to the next available st, not in the stitch at the base of the 3 chains) x 5.
Fasten off, leave a tail to tight a knot. Tighten up the magic ring center. With a tapestry needle, grab the ending tail, and bring it at the back.
Tie a knot around a small piece of wood.
Hint number 1: if the points of your star tend to bend too much inwards, try to start again and loosen up your tension. It’s polyster fiber, so it’s quite elastic, try to not pull too much on your slip stitches. Once it’s done, you can also try to flatten it a bit with your iron, put a towel on your star to protect the fiber (if you put your iron directly on it, it might melt the yarn and make a mess on your iron), and press it for a few seconds (start with 5 seconds, increase slowly and check your star).
Hint number 2: if you’re afraid that the piece of wood will be lost or damaged (if it’s for a child for example), you could also sew the star to the belly !
1) Sew the body to the head (the bumpy part of the body is at the back, it’s where you’ll attach the pom pom tail).
2) Sew the ears to the head (the front part of the ears is 3 rounds behind the eyes).
3) Sew the antlers to the head with two stitches in between.
4) Sew the feets to the body: sew the last round first, then using the same yarn tail, grab a stitch on the top of the feet towards the front and sew it to the body (so that the bunny is standing on flat feets, although it’s normal if it doesn’t stand still by itself).
5) Sew the arms to the body.
6) Sew the white belly to the body.
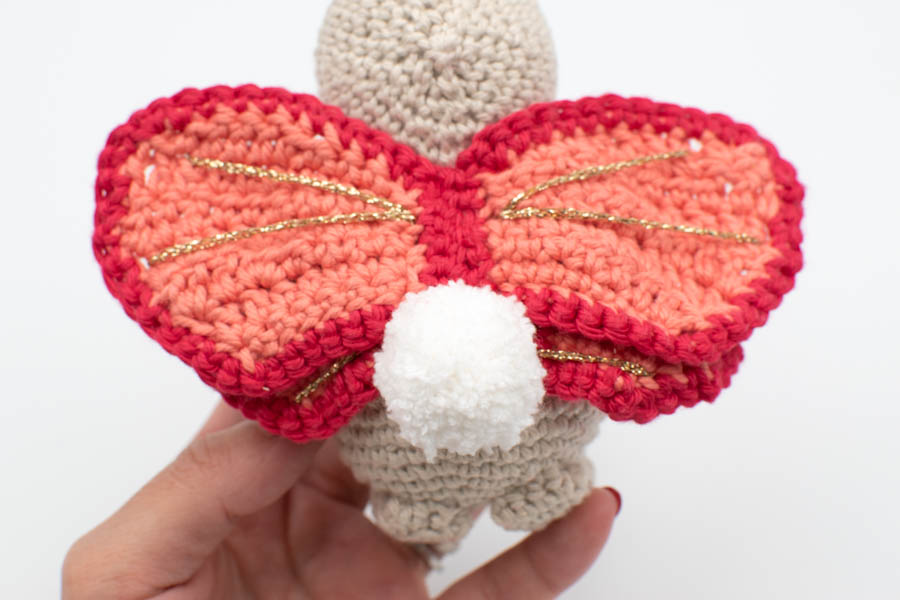
7) To assemble the wings, position them first with ball point pins to see how the lower wings should go. Position the lower wings first, then the upper wings, check if you like it, then remove the upper wings and sew the lower wings.
8) Decorate your wings with golden threads or pearls, or embroidery.
9) Attach the pom pom just below the upper wings (you can also glue it if appropriate).
10) Embroider the nose, mouth and eyebrows, and I like to add a little bit of make-up blush on the cheeks.
I’d be really happy to see your finished flying bunny! Tag me on Instagram, you can find me as @octopuscrochetdesign and use the hashtag #octopuscrochet
I look forward to seeing it!
Crochet Designer
Hi friend, I learned crochet online, so you can do it too! I created this blog to share my tips and tricks for beginners and detailed patterns of amigurumis, crochet toys and home decor items. Jump in and beware of the crochet addiction: it’s real!!!