
Sharing is caring!
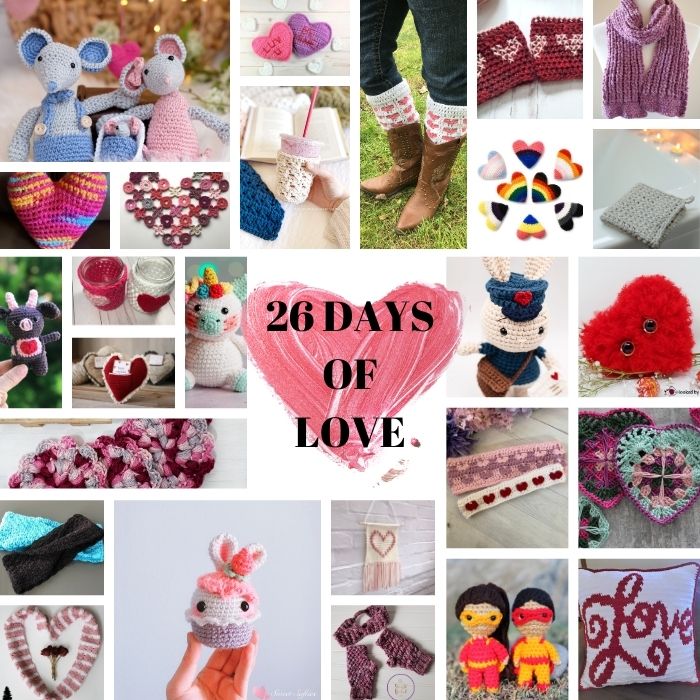
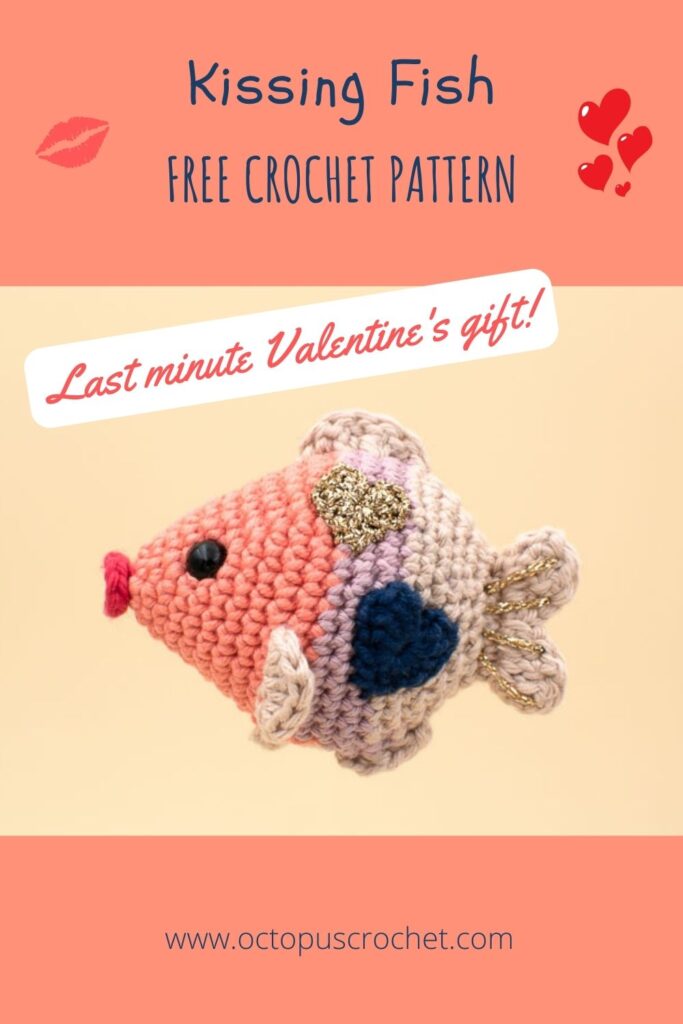
It’s Valentine’s day in less than a week and you’re late on planning? Don’t panick, I got you covered with this kissing fish amigurumi pattern! It’s the perfect last minute Valentine’s gift to make over the weekend! If you’re fast you can even make two and play with colours, I guarantee you’ll have a wow effect!
Read about my inspiration below, then you can purchase the pdf to get all the step-by-step pictures or scroll down for the free version.
No time right now? Pin this crochet pattern for later.
*This blog contains affiliate links for products I use, believe in or recommend. This means I will earn a small commission if you make a purchase from one of these links, and of course it is at no extra cost for you. It helps me to keep Octopus Crochet going and to keep publishing new free patterns and tutorials for you to enjoy, so thank you! You can check my full disclosure here.
If you prefer to purchase an inexpensive add-free pdf version of this pattern I’ve got you covered. The premium pdf version has all the instructions, more step by step pictures, no ad, and it’s ready-to-print for you to carry around everywhere you can crochet and are not in front of a laptop. The kissing fish amigurumi pattern is available in my shop on Etsy.
Well I’m a diver, although it’s been far too long since my last dive, so I’m just a huge fan of everything living at the bottom of the ocean. I’ve never seen such incredible colours in the Nature than while diving in the Similan Islands a few years back. I couldn’t believe it was real, and the diversity was also crazy. So, obviously, it’s an endless source of inspiration.
I used DMC Happy Cotton again for this one, what can I say I just love the texture and the colours!
Scroll down for the free patterns links below or you can also directly purchase a nice add-free pdf version of this project in my shop on Etsy for a small fee. The pdf version has all the pictures, instructions, and it’s ready-to-print to carry along with you wherever you want to sit and crochet!
2.5mm crochet hook / US C-2
Yarn:
o DMC Happy cotton: shades 793 (salmon), 768 (pale purple), 773 (beige), 758 (dark blue), 754 (pinkish red)
o Rico Design Creative Lamé Gold
Tapestry needle
Fiberfill
Stitch marker or a strand of thinner yarn.
A pair of 8mm safety eyes
Ball point pins for assembly
Adventurous beginners to intermediate.
Gauge for the stars and bunny with the above material: 5-round circle = 4cm (1.6″). Find out how to measure gauge for amigurumis in my tutorial here.
With the material mentioned above and when gauge is achieved:
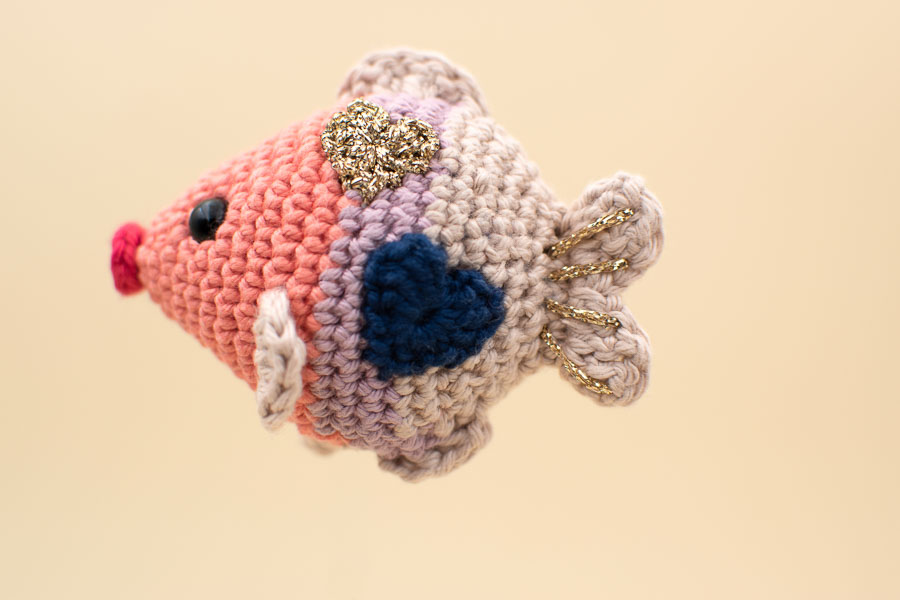
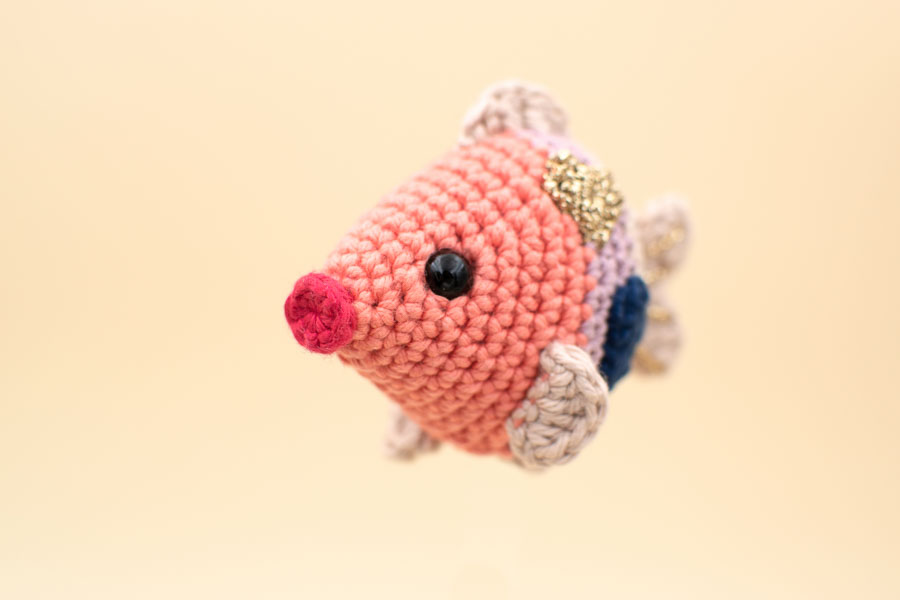
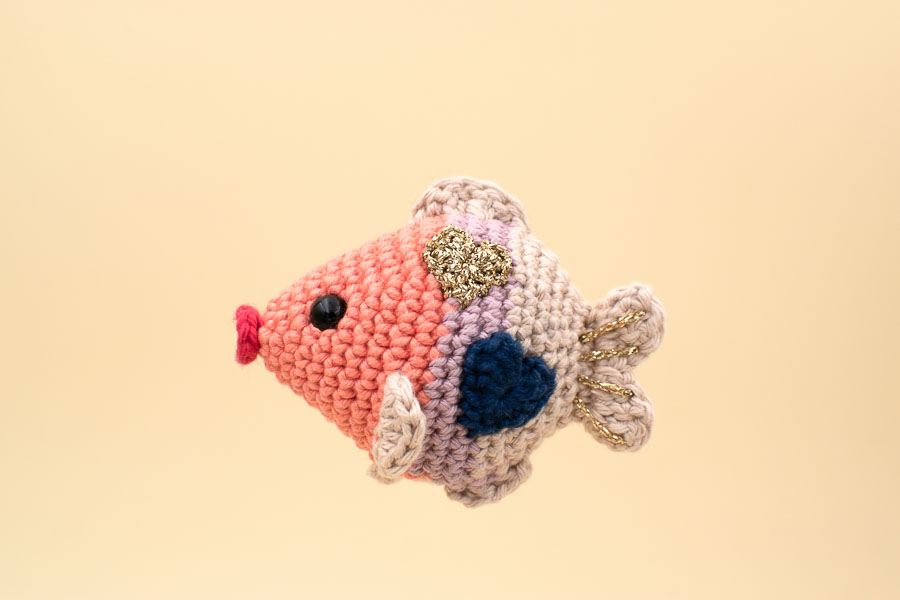
The fish is 9cm long (3.5”), 7cm high (2.7”)
st: stitch/es
sc: single crochet
hdc: half double crochet
dc: double crochet
tr: treble crochet
sl st: slip stitch
inc: single crochet increase (work 2 sc into the same st)
dec: single crochet decrease (single crochet two stitches together).
[number]: total number of stitches of the round (or row)
Rnd: round
(…) x 2: repeat whatever is inside the brackets the number of times indicated
(…) in next st: work all the instructions inside the brackets in the next stitch.
in BLO: in the back loop only
in FLO: in the front loop only
With DMC Happy Cotton shade 793 (salmon).
Rnd 1: Work 6sc into a magic ring. [6]
Rnd 2: (inc, sc) x 3. [9]
Rnd 3: (2sc, inc) x 3. [12]
Rnd 4: (3sc, inc) x 3c. [15]
Rnd 5: (4sc, inc) x 3. [18]
Rnd 6: (5sc, inc) x 3. [21]
Rnd 7: (6sc, inc) x 3. [24]
Rdn 8: (7sc, inc) x 3. [27]
Rnd 9: (8sc, inc) x 3. [30]
Rnd 10: (9sc, inc) x 3. [33]
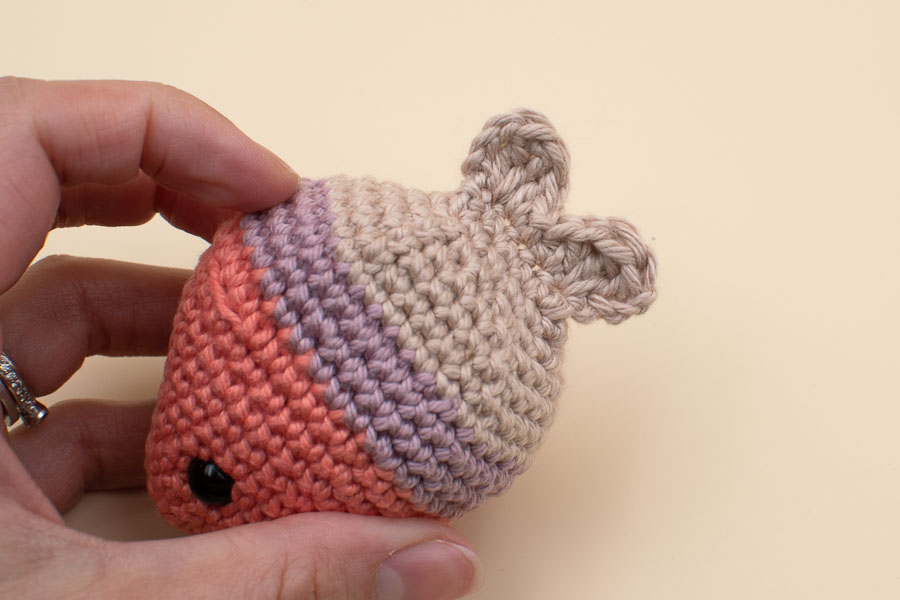
Rnd 11: 2sc, in BLO 3sc, 20sc (in both loops again), in BLO 3sc, 5sc (in both loops again). [33]
Change colour to DMC Happy Cotton shade 768 (purple)
Rnd 12: (10sc, inc) x 3. [36]
Insert safety eyes: the start of your rounds is at the bottom of the fish. Insert safety eyes between rounds 5 and 6, with 7 stitches between the two eyes when counting stitches on round 6 (make sure the eyes are positioned approximately at the same distance from the fins, that will be crocheted using the front loops left at round 11).
Rnd 13: 8sc, inc, 9sc, inc, 8sc, inc, 8sc. [39]
Rnd 14: sc around. [39]
Change colour to beige (finish the last sc with beige).
Rnd 15: dec, 10sc, dec, 11sc, dec, 10sc, dec. [35]
Rnd 16: (dec, 5sc) x 5. [30]
If you haven’t done it already, cut the yarn strands at every colour change, make a knot with the other strands around to secure them, and push them down so that they don’t get in your way.
Start filling with fiberfill.
Rnd 17: (dec, 4sc) x 5. [25]
Rnd 18: (dec, 3sc) x 5. [20]
Rnd 19: (dec, 2sc) x 5. [15]
Rnd 20: (dec, 3sc) x 3. [12]
Finish stuffing with fiberfill.
Rnd 21: Flatten and sc both sides together so that you end up with 5sc. [5]
Don’t fasten off.
Now let’s crochet the tail:
Row 1: turn your work, chain 3, (2tr) in the first st, (dc, hdc) in next st, sl st in next st, (hdc, dc) in next st, (2tr) in last st, chain 3, sl st in same st (where you did the 2 tr).
Fasten off leaving a tail, make a knot to secure it, and hide the yarn end inside the fish.
With beige yarn.
Make a slip knot.
The pectoral fins are crocheted using the front loops from round 11. The fin is crocheted in rows, and the front side of row 2 is prettier than the wrong side: for the left fin, start crocheting from top to bottom (in other words, start in the loop that is closer from the back of the fish, and crocheting towards the belly). For the right fin, start crocheting from bottom to top (or from the belly towards the back).
Row 1: 3sc. [3]
Row 2: chain 1, turn, (sc, hdc) in first st, (2dc) in next st, (hdc, sc) in last st. [6] (The chain doesn’t count as a stitch)
Fasten off leaving a tail, secure it with a knot, and hide it inside. Hide the other yarn tail inside as well.
With DMC Happy Cotton 773 (beige).
Make a slip knot.
Start on the top of the fish, insert your hook between row 9 and 10 at the center (in relation to the eyes), and exit between row 10 and 11.
Row 1: Sl st, (hdc, dc) in next st, (2dc) in next st, (2dc) in next st, skip 1, sl st. [7] (The first sl st doesn’t count as a stitch).
With beige yarn.
Make a slip knot. Under the fish belly, at the center, insert your hook between rounds 12 and 13, and exit between rounds 13 and 14.
Row 1: sl st in the first st, (2hdc) in next st, (2hdc) in next st, sl st in next st. [5] (The first sl st doesn’t count as a stitch).
Fasten off, leaving a tail, make a knot to secure the yarn end, and hide the tail inside.
With Happy Cotton shade 754 (pinkish red).
Rnd 1: work 8sc into a magic ring. [8]
Sl st in the first st of rnd 1. Fasten off leaving a long tail for sewing.
Pull the starting tail very tight to close the hole at the center of the ring. Then grab it with a tapestry needle and insert it in the center of the ring, pull again to close the hole.
Use your tapestry needle to sew the mouth. Pinch it a bit with your fingers to give it a lips shape. It should be centered on Round 1 of the body. Use the two tails to secure its position by grabbing some strands at the back of the mouth.
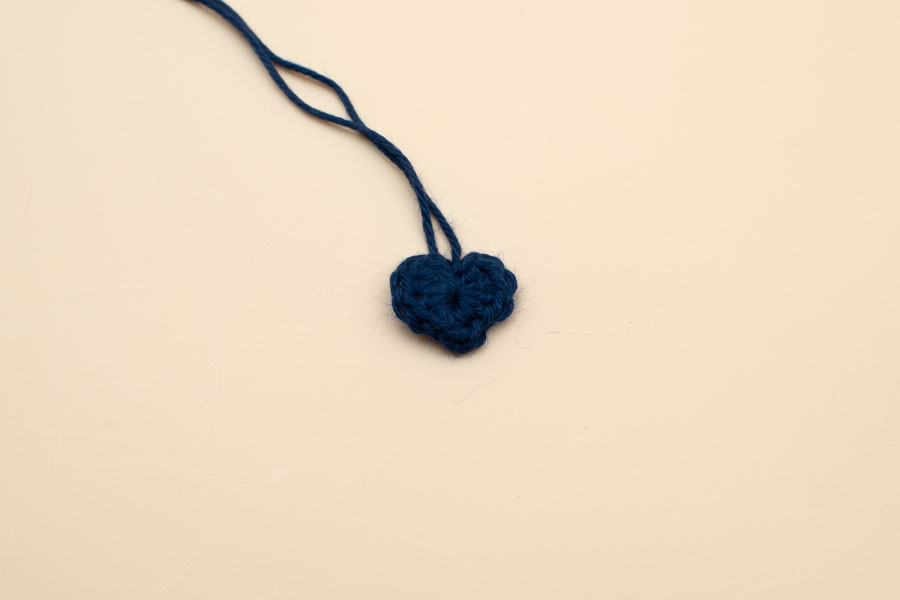
With DMC Happy Cotton 758 ( dark blue).
Make a magic ring and keep a long starting tail.
Rnd 1: chain 1, and make all the following in the ring (3dc, 2sc, 1dc, 2sc, 3dc), chain 1, sl st into the ring.
Fasten off leaving a long tail for sewing (20cm / 8”).
Close the ring tight by pulling the starting yarn.
Make a second one with a golden yarn (I used Rico Design Creative Lamé Gold).
The last thing left to do is to sew the hearts on your fish, and decorate the tail with a strand of golden yarn! Congratulations! And now swim little kissing fish…
I’d be really happy to see your finished mobile ! Tag me on Instagram, you can find me as @octopuscrochetdesign and use the hashtag #octopuscrochet
I look forward to seeing it!
Crochet Designer
Hi friend, I learned crochet online, so you can do it too! I created this blog to share my tips and tricks for beginners and detailed patterns of amigurumis, crochet toys and home decor items. Jump in and beware of the crochet addiction: it’s real!!!